Sunday, July 31, 2016

Boy's Bedroom Makeover - All Things Automotive

Hi Y'all!!  Can you even believe it's been 3 months since I've posted anything?!?  *sweeps cobwebs away* When I looked at the date of my last post my jaw dropped.  I could not believe so much time had passed.  It certainly didn't seem that long.  But life has been speeding along and our summer has been filled with a growing baby (she's 6 months old now!), swimming lessons, trips to the springs, family visits, shower curtain making, attending Hubby's softball games, church get-togethers, etc.

But....onto today's post.

Let me preface this post about my son's room makeover by saying that this room has actually been done for well over a year and I've never shared it. *hangs head in shame*  I won't bore you with the details of why it never got shared, so let's just go with...I'm sharing it now.  : )

This is what his room looked like for the first year that we lived here.
Poor kid.


As you might recall from some of the other room makeovers I've done so far, most of the walls in this house were a weird peachy orange color done with flat paint that had absorbed years of dirt and stains.  This room was no exception.  He had a hodge podge of furniture and not enough toy storage.  His bed was handed down from my daughter when she got a double bed.  The headboard was too girly so we sold it and he was left with just the basic frame. The quilt was too big, just an extra one I had picked up at Goodwill for $5 that we were using for the time being.


 The blinds on his window were dirty and broken and the right one wouldn't extend all the way down.  We had to keep an oscillating fan on the dresser to keep things cool in the summer.  (though why the fan is still there when there's a Christmas tree in the corner baffles me.  Or maybe the Christmas tree was still there come summer time.  I really can't be sure).

This room, like all the others, also had the dark wood trim.  I had already started priming the ceiling trim when I took this picture.
 

In the picture below you can see a set of brown metal shelves.  I got these at a yard sale for $5 knowing I wanted to do an automotive theme for his room.  They were a catchall for awhile there until his room got its makeover.


Once or twice a year the kids spend a week or so down south with their grandparents and last year during one of the times they were gone I decided to get his room done and surprise him when he got home.  He knew I was going to be working on it, he just didn't know what all I had planned. 

The boy has been obsessed with anything and everything automotive since he was 9 months old and started making car noises while pushing a car along the floor.  So I knew he would love a room with that theme and I had been collecting things for quite awhile.  So after a whirlwind week of hardwork he walked into his room looking like this instead.

*


*


*


*


*


To say he was excited would be severely understated. His jaw dropped, he raised his hands in the air and yelled YES!, and immediately began jumping around on the bed, lol!

His favorite color is orange so I had promised him I would include it somehow in his room.  He LOVED the stripes on the wall.  Blue is his second favorite color.  : )  The rest of the walls were painted a khaki color.  I don't remember the specific name of the color, but it was some sort of khaki/tan.


When you first walk up to his room you actually see the side of his closet first.  I found the sign at a flea market for a few dollars and had bought the numbered hooks years before at Hobby Lobby knowing I would use them someday in his room.  They hold his cowboy dress-up clothes, his hats, and on Sundays he hangs his church clothes on them in between services.


I took down the broken blinds and replaced them with roller shades.  I found the curtain rod at a thrift store for $3 I think, and the curtains actually came from a single curtain panel.  A local thrift store has a 50% off day once a month and I found a single, navy blue, panel with tabs on it at the top.  With the discount I only paid $2.50 for it.  I brought it home and cut the tabs off since they didn't line up with what I planned to do.  Then I cut the panel in half, sewed new rod pockets on them, and then sewed on stripes of green ribbon that I already had.  So for only a little over $2 I had a cute set of curtains to match.


I spray painted the brown metal shelves gray and bought canvas bins for his toys.  
You can see that he keeps them stuffed full, lol!


On the top of his shelf is a little wooden train that spells his name.  I bought the magnetic train letters at a craft fair.  He has his great grandpa's name and it's very unique, so we never find it in stores on key chains and cups, so its fun for him to have something like this instead.

At a recent yard sale he found a whole collection of vehicle emblems for 50¢ each.  He had brought a dollar along so he got to pick out two of them.  We added them to the front of the shelves.  The old gas can was a $1 yard sale find that was originally supposed to be for my Etsy shop, but I decided to keep it for his room instead.  He's kind of over it now, but there for awhile he loved the movie Cars so we added this Route 66 sign.  He says he's over Lightning McQueen now, but he still likes the road sign.  : )


Above his bed is a set of reproduction gas station signs I had bought the year before this makeover and had tucked away.  I had actually forgotten all about them and when I opened the box of stuff I had collected for his room it felt like Christmas morning!  : )


My husband built the headboard for me and I beat it up and stained it. It turned out just how I wanted, I love it!  The bedding was the big splurge for this room, it's from Pottery Barn.  My son actually picked it out.  I showed him several options that I thought would go well with his room and this is the one he picked.  He liked all the different colors in it and the fact that it had orange on it.  We got automotive themed sheets to go with it.  He found the little car pillow at a thrift store for $2.


He still takes a nap most days and he hated having to remake his bed twice a day so we started keeping a blanket on the end of his bed.  I found this red and white afghan for $5 at a thrift store and it has become his favorite.  You can't really see it, but I also found a navy blue bed skirt at the same thrift store for $2.


Beside his bed I put this little red table that I made over a couple of years ago.  The gas pump is from Hobby Lobby and is a little bank.  He loves Legos and always has some sort of creation of his on display.  And one of my absolute favorite things in his room is his night light.


It was a turn signal from a school bus that I got for $1.  We added a light to the back and made it into a night light for him.  It has a nice warm glow at night.  I just love how unique it is!


And the knob on the drawer of the little table looks like a shifter knob.  He found it at Hobby Lobby and was so proud of it!  : )


This plastic bucket keeps his Hot Wheels collection contained.  Well....mostly contained....some of the time.  You can see I decided to leave the trim in his room the dark wood.  I painted only the ceiling trim so that it would blend in with the ceiling and make the room look and feel bigger.  The rest of the trim I left alone for 2 reasons.  1) it has a more masculine feel to it being wood, and 2) he's a 5 year old boy who loves cars....I knew it was bound to get crashed into and banged up so I didn't see the point in painting it and then getting upset when he chipped it.


On the other side of the curtains he has a shelf and a big bucket for his stuffed animals.  He always loves to sleep with 2 or 3 of them.  : )


This shelf was actually made for me by my grandpa when I was in high school. It's been painted a couple of different colors through the years depending on what room it's being used in.  For now it holds his little T-ball trophies and soccer medals, his baby handprint, and a jar of shells collected on beach trips with the grandparents.


Next to his closet is this little bookcase that we've had since my daughter was a baby.  She got a desk with built-in bookshelves so we passed this on for him to use.  Above that is a speed limit sign that I got at a flea market, I think I paid $15 for it.


On top of it he has his tractor bank.  He loves anything with wheels, but especially anything John Deere since his daddy is a John Deere diesel mechanic.  I found the little gas station sign at Hobby Lobby.  I'm old enough that I can remember my dad buying gas at Standard stations.  Besides his love of all things with tires and engines, the boy also loves art.  He's constantly drawing and creating.  I found that metal thingy-ma-bob at a yard sale for $1.  It's something or other automotive related and it makes a perfect pen/marker/scissor holder.

A couple of other fun little touches in his room are this diamond plate light switch cover I found at Walmart....


and this motorcycle ceiling fan light pull (we were able to get rid of the ugly oscillating fan when we put a ceiling fan up). 


So let's do a quick look back at the before and afters.


I don't know if you noticed that I never showed the 4th wall in his room.  The wall opposite the bed.  That wall has his dresser and that project isn't complete yet.  I'm very very close and SO excited to finally show you that project reveal as well.  Hopefully very soon!

In the meantime, I hope you've enjoyed this automotive themed boy's room makeover.  
I know we've sure enjoyed the change! 


Sharing over at:

Saturday, April 23, 2016

Dreaming of a Screened in Porch

Ok, so most of you probably already know that we live in Florida, and in Florida that means rain....and bugs.  We have a really nice back deck, but it tends to not get used as much as it could because it's not covered.  I dream of the day we can put a roof over it and screen it in to keep out those pesky mosquitoes.  I dream of a cozy but practical space where we could eat dinner on nice evenings without the added insect guests, where I could sip my morning coffee without sitting on a dew covered chair, and where we could sit on a porch swing and enjoy a good Florida thunderstorm.

So, I said all of that to lead up to this.  I was contacted about participating in a Florida Room style board challenge and I agreed.  The challenge was to create my dream room, but still keep some of the beachy feel of a typical Florida room.  I get a couple of these types of request every month and I usually turn them down, but this one sounded like fun.  Partly because A) again, I live in Florida, and B) as I stated, I would LOVE to have a Florida room (a.k.a. the screened in porch), and C) it seemed like a fun challenge to take what is typically a coastal/beach themed room and put my own rustic farmhouse spin on it but without completely doing away with the Florida room style.

I didn't want to create an outdoor living room like you see a lot of times because, honestly, that's just not practical in Florida.  I guess if you had an actual room that was temperature controlled it could work, but with a screened in porch type of a room the furniture would get mildewed faster than chocolate melting in the hot Florida sun.  So I chose to keep it outdoor friendly and practical, yet cozy and comfy. 

Here's what I came up with.


Florida Room - Farmhouse Style


Every great porch has to have a porch swing, am I right?!?  And this basic white one is a great crossover piece for the two styles.  Plants are a great way to add a beachy casual feel to a room, but why not tuck them down into a galvanized wash bin stand to make them more rustic styled?  The chippy aqua table with white lanterns add a great coastal touch, but the red plaid rug underneath lends the cozy farmhouse feel.  Nothing says "beach" like wicker and chairs like this would be the perfect cozy addition to a casual porch made for relaxing.  A cute little grain sack striped pillow keeps it from feeling TOO beachy.  A chippy antique door leaned up in the corner is a great farmhouse style piece, and the soft green sign hanging on it is a great coastal color.  The rustic wooden crates make a great little storage area for books, games, shoes when you come in from the yard, and are also a great place to set down your Mason jar drink or morning cup of coffee.  (And by the way, those red Chucks?  Chucks are my very favorite type of shoe!  I have at least 6 pairs in various colors, lol!)  Another little plant tucked inside brings a touch of the outdoor beach feel to it.  And of course, last but not least, lighting.  I LOVE LOVE LOVE string lights and I would SO hang them all around the room for the perfect evening mood lighting.

So there's my take on how to combine a coastal/beach style with rustic farmhouse style and turn it into a cozy place where your family and friends would love to relax.


If you would like the link to any of these items I've included in my style board you can find them {here}, or here are some great Flordia properties for continued inspiration if this sparked your interest.


Monday, April 4, 2016

A Farmhouse Chandelier Makeover


Ok, so I'm sure you can tell from the title what today's post is going to be about.....a makeover story.....about a chandelier.....a dreamy farmhouse chandelier......now my chandelier.

So since you already know what it's about, I won't keep you in suspense.

Let's just cut to the chase and show it to you.


Ain't it purdy?!?

Do you want to know how much it cost me?  $100?  Too high.  $75?  Nope.  $50?  Keep going.  $25?  Still too high.  $15??  Lower.  $10?!?  Even lower.  $5?!?!?!  Almost there.  $4???  Yep!!  You got it, a budget breaking, whoppin' total of FOUR dollars!!  Can you believe that?!?
 

It didn't always look like that though.  It started off looking like this.


But I'm getting ahead of myself.  Let's back up a couple of years and I'll share a story, a two year story about the search for a chandelier.

When we moved into this house the family room was connected to the kitchen, carpet and all.  Yuck!  But I had always dreamed of a big kitchen and dining room being all connected.  I envisioned a big farmhouse table with a farmhouse style lighting fixture above it, etc etc.  So we turned what was the family room into our dining room so that it would be connected to the kitchen.  I didn't have the big farmhouse table (and still don't) and for the time being we just put in a really basic ceiling fan from Walmart. But I always had the dream of a better lighting fixture in the back of my mind.  

So for two years I've casually searched at yard sales and thrift stores for the perfect find.  
I've researched online to see what styles "spoke to me."  I scoured Pinterest for farmhouse chandeliers and lighting fixtures.  What I discovered was this; the style of farmhouse lighting that seems to be popular right now is basically anything and everything repurposed.  While I do like the occasional one that has been upcycled, most of them seem hokey to me.  Like somebody was just trying to get more pins on Pinterest or more visits to their blog because they added an LED touch light to a car engine, hung it from some strands of jute twine, and called it a chandelier.  I know that's a bit extreme, but that's how some of them seem to me.  The other thing I didn't care much for on the repurposed fixtures is that the light output often times seems very minimal and impractical.  We have a large dining room and I would need something with more than one bulb to keep it well lit.  So I determined that I was not really looking to repurpose anything.  The style I kept coming back to time and time again was the more primitive/colonial style of chandeliers.

Something along the lines of these:

(source)

(source)


But the problem was that those types are always so much more than I'm willing to pay or can even afford to pay.  

There have been a few times that I found something that I thought could work.  One time at Lowes I came across a chandelier that was somewhat similar to this style and it was on clearance.  I stood there and stared at it and debated, but ended up leaving the store without it.  After I got home I kept thinking about it and wishing I had bought it, so the next morning I called Lowes to see if they still had it, but alas, it had just sold....15 minutes before I called.  Wasn't meant to be I guess.

Another time I saw one in a local used furniture store for $40, but I passed it up.  I didn't love it and it didn't have any special story to it, so I let it go.  Yet another time I saw one in a Habitat Restore for $50 that I knew I could repaint and fix up and make it work.  But $50 seemed like a lot of money to me since I was trying to save money for our laundry room makeover as well as saving for the built in shelving unit my brother was going to do for me.  So I passed it up too.

THEN.......the same week my brother came up to start building for me, my parents were also here visiting for the weekend.  Saturday morning my mom and I were just sitting in the living room drinking coffee and chatting when I remembered that a little retirement village just down the road from us was having their community yard sale.  Hubby agreed to keep the kids so Mom and I hopped in the van and drove the mile down the road and did a quick 15 minute pass through their community building where it was being held.  Sitting outside in between a beat up old recliner and some pressed wood cabinets that were falling apart I spied two chandeliers.  And let me tell you...they were UGLY!  I almost didn't even walk over to look closer, but I figured it can't hurt to look so I went over anyways and that's when I found it.


It was so ugly, right??

But....I could see the potential,  because when I moved the sticky nasty chain and the ceiling mount piece that someone had carelessly swiped white paint across, I found this.


A perfectly authentically worn wooden center section.

And once the globes were gone I could see it had great, basic colonial-style lines to it. 

 
 I knew it would take a lot of work because this thing was NASTY dirty, covered in sticky nicotine and dust and rusty.  

Did you just throw up a little in your mouth? 

I was thinking in my head that if it were around $5 I would be willing to chance it possibly not even working and also to put in the work necessary to clean it up and transform it.  When I asked about it the man looked at me like I was crazy for wanting it, but told me, "How 'bout $4?"  Big grin...."I'll take it!"  :D

 So I toted it home and had Hubby check the wiring to see if it even worked before I got too excited about it.  It did indeed work so during that week that my brother was building shelves for me, I got busy working on this.

I put on some rubber gloves and took some Krud Kutter (amazing stuff by the way!), a scrubby, and an old toothbrush to it.  Just look at all that nastiness that came off of it!!!  Bleck!!

While I was cleaning it I was thinking that I would need to buy a can of flat black paint to paint the arms and candle holder parts so that it would match the flat black of the middle wooden piece.  Then I remembered that I still had half a can of chalkboard paint left from other projects and that, essentially, it would have a flat black finish.  So I taped off the wooden middle section because I wanted to leave it just as it was and I painted the rest of it with the chalkboard paint.  It worked perfectly.

You can't really tell it in the pictures, but the candle cover pieces were really nasty, too.  They were orange-ish in some spots, I guess from age and the nicotine.  I wasn't sure if I wanted them to have a drippy candle look like some of the primitive/colonial style ones have or if I wanted them to be plain black, so I started by painting them black.


It was MUCH improved, but it was just TOO much black for my taste.  I looked online to see if I could buy the drippy wax looking candle covers and I could have, but I didn't really care for them because they looked SO fake.  I studied them a bit and realized I could recreate (and improve) the look on my own using hot glue and not have to spend any money.
So that's what I did.  I used a glue gun and made the wax drips, then used some white primer paint I had and covered up the black.  Once that was dry I gave them a top coat of ivory paint, which I also already had. 


It needed just a little bit more character so the last step was to add a few touches of Spanish Copper Rub-N-Buff here and there on the edges to give it a bit of an aged look so that it wasn't just plain black.  (Though, honestly, when the lights are on you can't even see the aging details.  It just looks black.)  I already had the Rub-N-Buff so that made the cost of this makeover.....totally FREE! 


If you look closely you can see the aging details around the rim of the candle holder as well as some touches on the ridged part underneath.


And here's how it looks in the dining room.


I absolutely LOVE it!!  
And I love that it has a story all its own.  And I love that I spent so very little on it.  And I love how much character it adds to this room.  Are you getting the idea?  
I love it so much! 

I had to do quite a bit of searching to find a "before" picture that showed how the room looked with the ceiling fan because whenever I took pictures of this room I did my best not to let the fan show because I didn't care for it.  But I did find this cell phone picture from 2 years ago where you can see part of the fan.


It's amazing how much brighter the room is now!  I didn't think going from 4 lights on the fan to 5 lights on the chandelier would make that much of a difference, but I didn't take into account the fact that the light would now be bouncing off the white ceiling instead of just shining down.
It makes a huge difference!

Let's take one more look at the before and after of the transformation, shall we?


The key to having a home you love is to have the patience to wait for the things you love. 
 If you're surrounded by things that have a story or just simply things that "spoke to you" then you'll always enjoy being in the midst of them.  It doesn't matter where you find them, it could be a thrift store or a yard sale, the side of the road, on clearance, or even full price at a huge department store.  Where it comes from doesn't matter, the fact that you love it and you connect with it does.  So be patient when you're looking to fill that empty spot in the corner.  The perfect piece will come along and if you settle for just anything in the meantime you will have wasted your money and ended up with a home you love a little less.


                                                                   Sharing over at:

Wednesday, March 16, 2016

Big Project in Progress!!

 I am SOOOO very excited you guys!! 
I just had to share a sneak peak at what's happening at the farmhouse this week!  I hinted at it on the Facebook page and said it was a HUGE project.  Well, it's not HUGE like an addition onto the house huge, or a whole kitchen renovation huge, but...it's huge to me for two reasons.  A) it's bigger than most of the projects I blog about, and B) I've been dreaming of this for almost 2 years so it's HUGE to me!!  :D

If you've been with me awhile you may remember a post from around 2 years ago when I painted our living room area and Hubby tore down some walls in our house.  If you're newish around here then let me fill you in real quick.

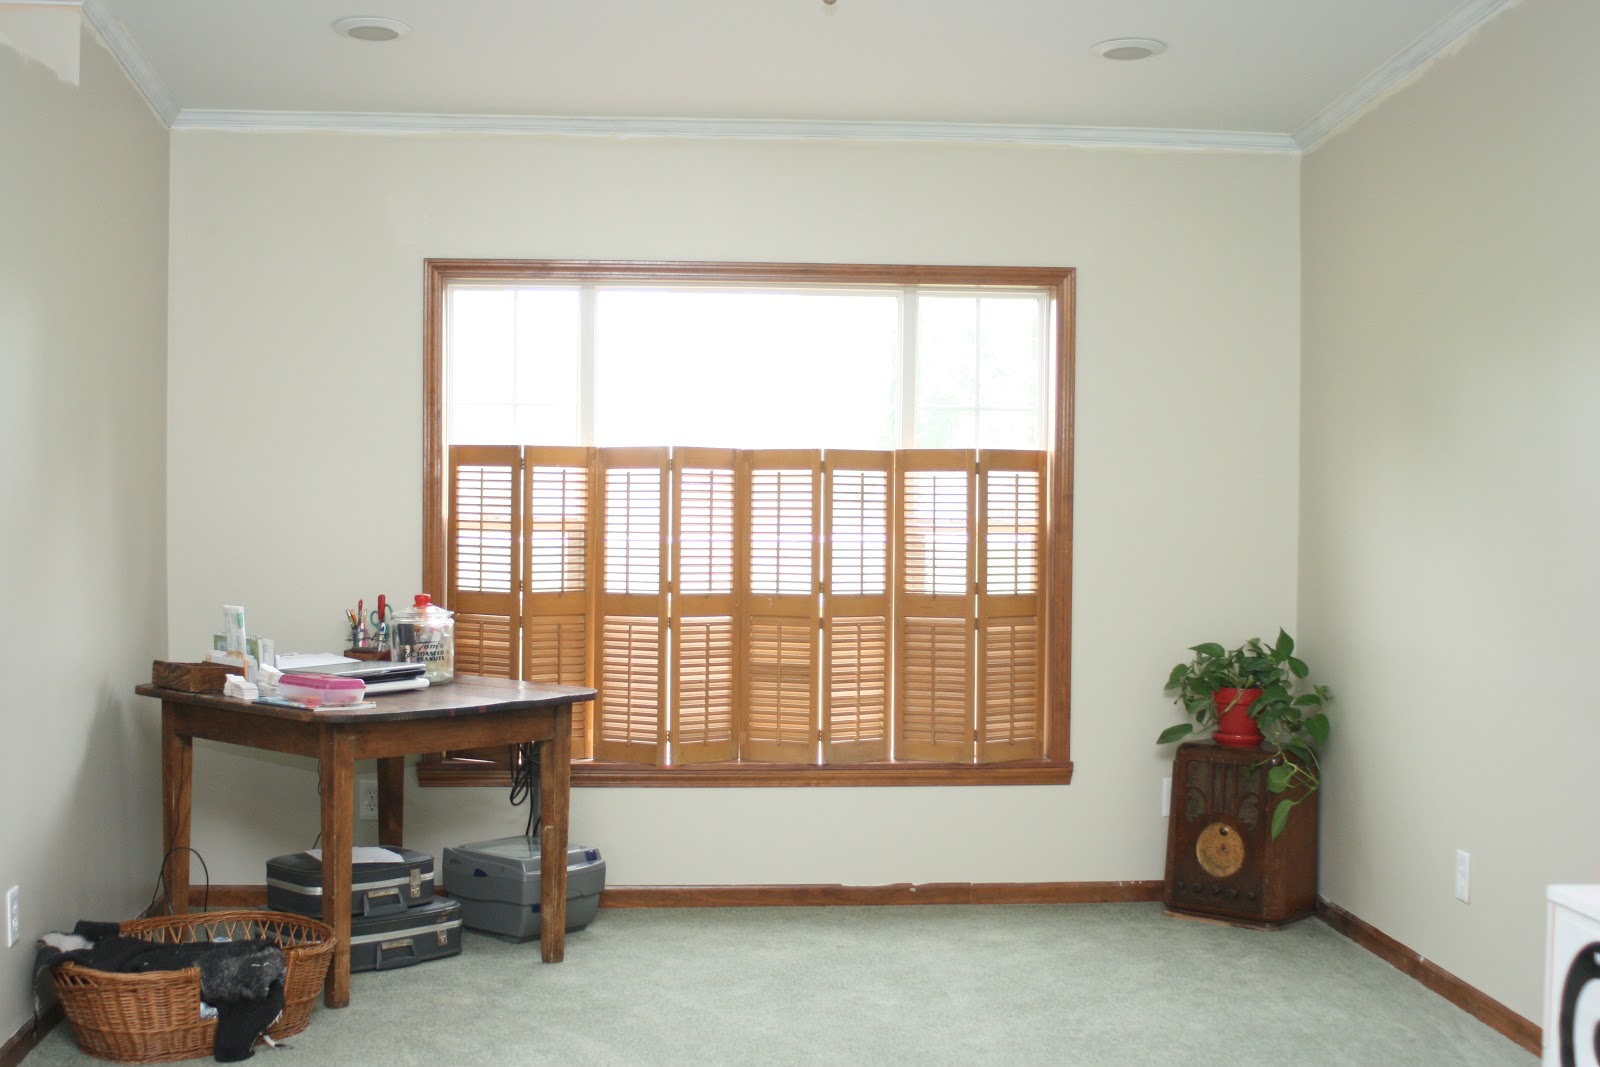
This little walled in area was originally supposed to be the dining room and this is how it looked when we first bought this house.  BUT....this area is right off the living room and around the corner from the kitchen.  Say what???  Such a weird set up!
 

The above picture is standing in the living room looking towards the "dining room."  

We knew right away there was no way that made any sense and we relocated the dining room to what was originally the family room next to the kitchen.  I know right?!?  WHO designed this place??  Anyways, one week while the kiddos were gone to their grandparents I got busy painting the whole living room and weird room area.  Hubs decided to go ahead and demo the strange 3/4 wall that same week and get the space opened up.

Here's what it looked like after being painted.  You can see I didn't have time to finish the rest of the trim work that week, it happened much later....like a year later, lol!

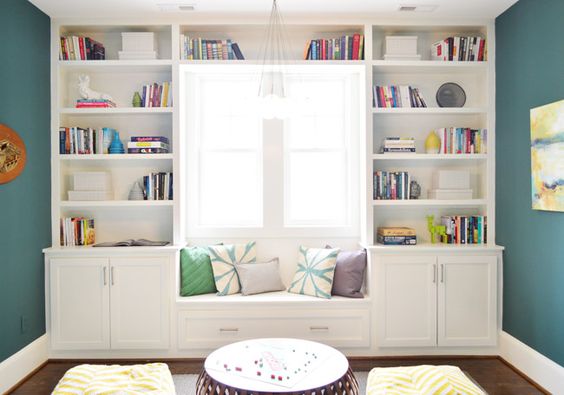
In that previous post I shared my vision for this wall/window area. 
I was dreaming of a wall of built-ins to give this area some functionality.  It could hold homeschooling books and the cabinets could hide craft supplies and photo albums.  The window seat would be a cozy place for my bookworm daughter to read.  Plenty of shelves would also give me more room to display my treasures.  :)
(source)

Well guess what???  
It's happening this week!!  I am SOOO very beyond excited!!!


I've been saving my money for months now and I convinced my amazing brother to come and stay with us for the week and build it for me.  I promised to ply him with grilled steak and ribs and plenty of good country cooking while he was here.  It must have worked because he agreed.  :D


He should be able to have the majority of the building part of it completed this week.  He doesn't have the needed tools here with him to do the cabinet doors, so he'll go back home and make those and bring them back later.  Once he's done building it'll be up to me to get it all primed and painted.  

I'll be posting more updates over on the Facebook page if you'd like to keep up with it over there. 

SO EXCITED!!!


Related Posts Plugin for WordPress, Blogger...