Wednesday, March 16, 2016

Big Project in Progress!!

 I am SOOOO very excited you guys!! 
I just had to share a sneak peak at what's happening at the farmhouse this week!  I hinted at it on the Facebook page and said it was a HUGE project.  Well, it's not HUGE like an addition onto the house huge, or a whole kitchen renovation huge, but...it's huge to me for two reasons.  A) it's bigger than most of the projects I blog about, and B) I've been dreaming of this for almost 2 years so it's HUGE to me!!  :D

If you've been with me awhile you may remember a post from around 2 years ago when I painted our living room area and Hubby tore down some walls in our house.  If you're newish around here then let me fill you in real quick.

This little walled in area was originally supposed to be the dining room and this is how it looked when we first bought this house.  BUT....this area is right off the living room and around the corner from the kitchen.  Say what???  Such a weird set up!
 

The above picture is standing in the living room looking towards the "dining room."  

We knew right away there was no way that made any sense and we relocated the dining room to what was originally the family room next to the kitchen.  I know right?!?  WHO designed this place??  Anyways, one week while the kiddos were gone to their grandparents I got busy painting the whole living room and weird room area.  Hubs decided to go ahead and demo the strange 3/4 wall that same week and get the space opened up.

Here's what it looked like after being painted.  You can see I didn't have time to finish the rest of the trim work that week, it happened much later....like a year later, lol!
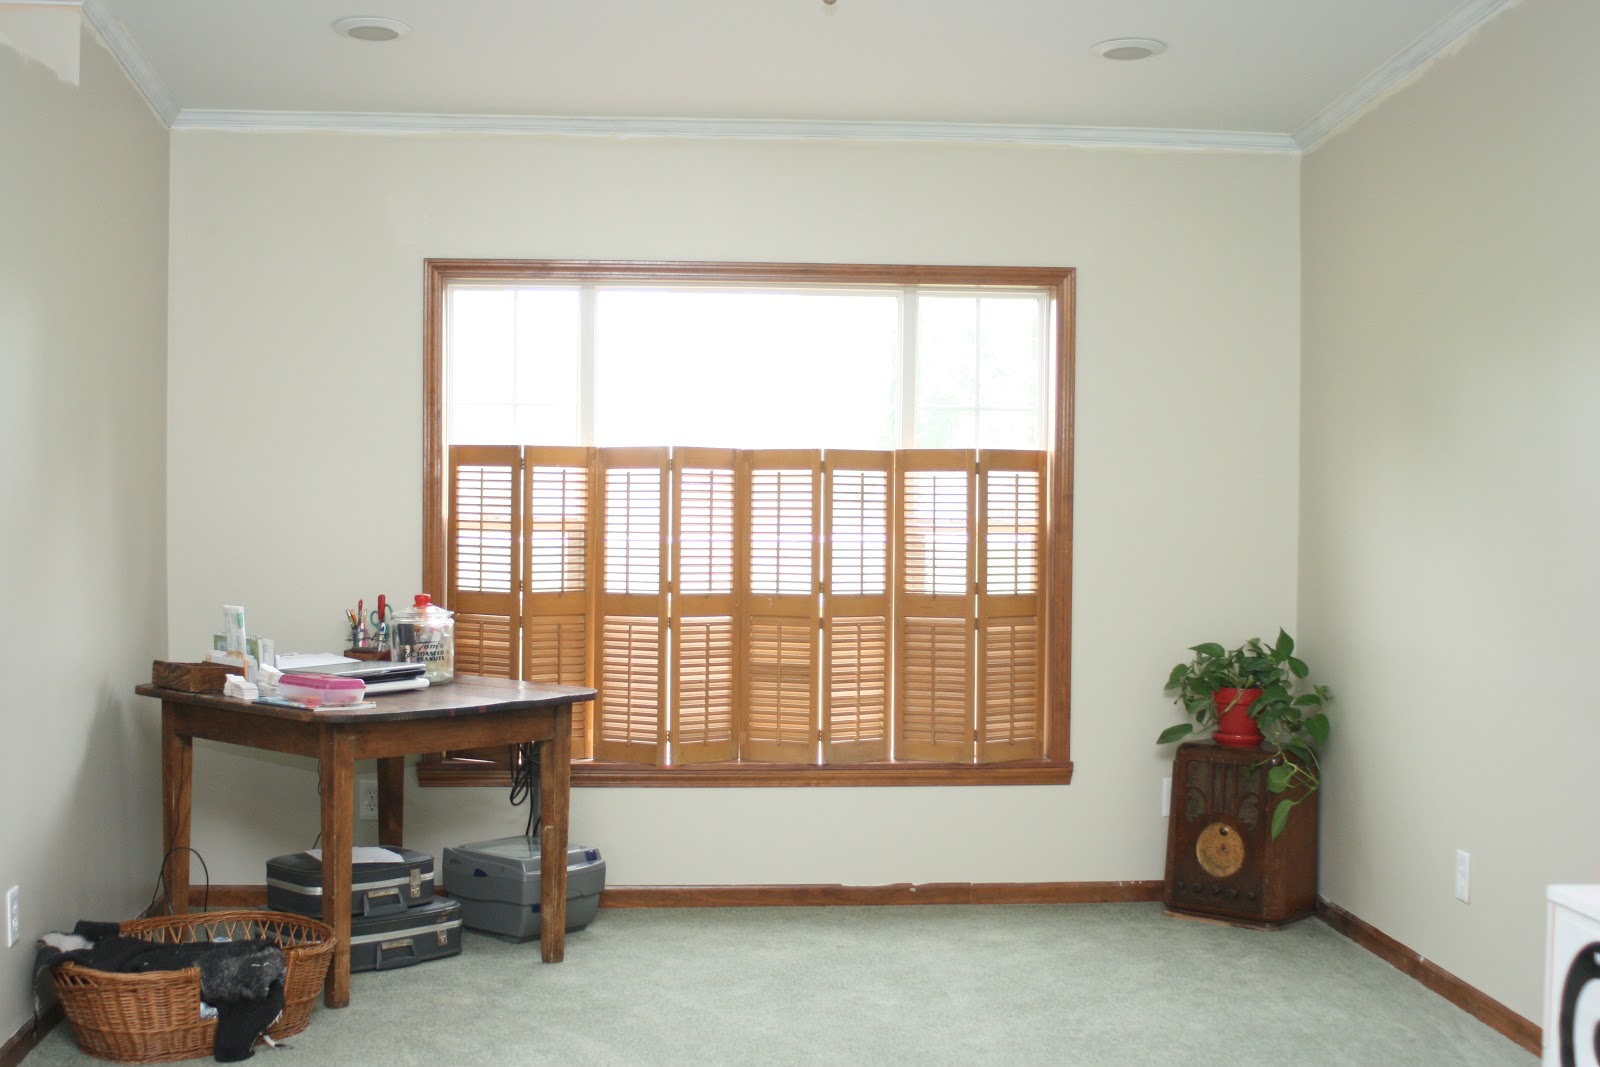
In that previous post I shared my vision for this wall/window area. 
I was dreaming of a wall of built-ins to give this area some functionality.  It could hold homeschooling books and the cabinets could hide craft supplies and photo albums.  The window seat would be a cozy place for my bookworm daughter to read.  Plenty of shelves would also give me more room to display my treasures.  :)
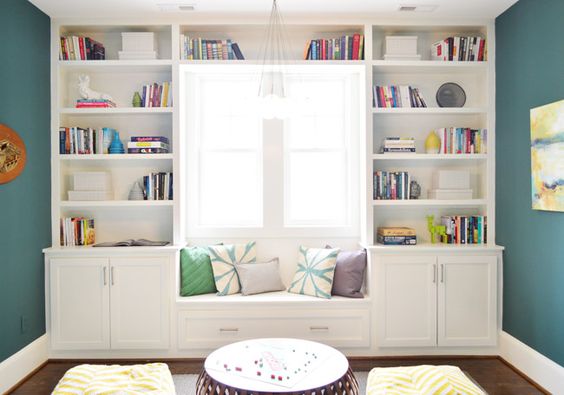
(source)

Well guess what???  
It's happening this week!!  I am SOOO very beyond excited!!!


I've been saving my money for months now and I convinced my amazing brother to come and stay with us for the week and build it for me.  I promised to ply him with grilled steak and ribs and plenty of good country cooking while he was here.  It must have worked because he agreed.  :D


He should be able to have the majority of the building part of it completed this week.  He doesn't have the needed tools here with him to do the cabinet doors, so he'll go back home and make those and bring them back later.  Once he's done building it'll be up to me to get it all primed and painted.  

I'll be posting more updates over on the Facebook page if you'd like to keep up with it over there. 

SO EXCITED!!!


Friday, February 26, 2016

Laundry Room Progress

Hello again everyone!  
I hope this blog post finds you doing well and surviving the winter weather with minimal amounts of the blues and fits of depression.  Hang in there!  Spring will be here soon! 

Today I have a short little post to share with you about a little bit of progress that has been made in our laundry room.  I've shared before how this room serves as our main entrance to the house because of the way the driveway is set up, so I've been working on getting it looking a little less cluttered and depressing and brighter and more streamlined and welcoming. 

For almost two years it looked like the picture below, dirty peachy/orange walls and dark trim.  With pretty much the only  natural light being from the window in the door this room could be quite dark and depressing.  But we were busy with working on other rooms in the house and this one has been low on the list.  But finally....we're getting to it.


Two months ago, when I was still hugely pregnant, Hubby took a weekend and got the room entirely painted for me.  My original plan was to paint it a light cheery yellow color, but at the last minute as he was walking out the door to go buy paint I changed my mind and told him, "Just get an off-the-shelf white and do the whole room white."  

So that's what he did and the room is so bright and clean feeling now! 


So that was a couple of months ago that he painted it, and then it just sat without any other changes until just last week.  I was in the middle of folding laundry and I went to the laundry room closet to put something away and suddenly the urge to organize and purge it hit me.  I've learned to just go with it even though it's a bit ADD, because if I don't it'll probably never get done.  So I spent the next hour clearing it out and making a pile to get rid of and a pile of decor that had been stored in there waiting for the room to be painted.  One of those pieces of decor was this little washboard cupboard.

I've had it for years and years.  I didn't make it, someone gave it to me and it was already made this way.  I've always loved it, but it's always had a purely decorative purpose.  This time I decided to make it functional and I hung it just inside the door.  I added "S" hooks to the bottom rung to hang our most used sets of keys, then I added small cup hooks to the inside to hang all the extra keys.  The little shelf on top holds my husband's stash of Tic-Tacs that he likes to grab on his way out the door to church.  : )  I added some fresh greenery clippings from the yard to a little galvanized bucket up there on top and I'm loving the touch of color and freshness it adds.


I also added our dog's name above her food dishes.  I was so surprised to find the wooden cutout of her name at a thrift store a year or so ago for only 99¢, and I just couldn't pass it up.  I've been saving it all this time for just this spot.  It was an ugly dark wood color originally so I used some craft paint and changed it to a navy blue.  I love the quirky touch it adds.  : )  My husband said, "Well it's a good thing you put her name up there.  Maybe now she'll be able to find her food."  He's so sarcastic, lol! 


You can see I also changed out the rug.  I found the blue denim one at Walmart and I love how heavy duty it has been.  The whole room is so much brighter and cleaner now.  I also love how the electrical panel box just disappears into the wall with the white paint.

I've made a couple of other changes already, and there are plenty more to come.  I've got lots of fun things in the works for this little room that I'll share another time.


In other news, little Anna Mae is a month old already and just as sweet and happy as she can be.  
We are loving life with 3 kids and all the craziness it brings.

I'll be back with more to share as time and life allow.  
In the meantime, I pray you are doing well and hope you have a blessed day!


Friday, January 29, 2016

Frugal Farm Themed Nursery Decor

Hello everyone!

Just in case you happened to miss it somehow in my last post, our sweet baby girl was finally born last week.  She is so sweet and cuddly and we have all been enjoying her so very much!

Today I want to show you around her "nursery" and share how I gave her a cute little corner on a small budget.  I have less than $20 invested in her farm themed decor.  Side note - I find it humorous that with my first child I spent so much time picking out the perfect furniture, the perfect bedding, the perfect this and that.  I agonized over the smallest details and spent so much time (and money) on her room.  By the time this 3rd child has come along, she gets the hand me down, teething-scarred, 8 year old furniture, and a yard sale find bedding set, lol! 

 I put nursery in quotes because she doesn't actually have her own room to be a real nursery, her little spot in the world is in a corner of the master bedroom.  Keep in mind, this is the last room that has yet to be painted so the walls still have the original weird peachy pink color on them and still have the dark trim.

So let me "show you around" a bit first and then we'll get into a little more detail of things.


Some perspective - the dark area you see to the right is the doorway leading into the master bathroom, and this picture was taken at the end of the bed looking across to the crib.


So her little area is tucked in along this wall across from our bed.


The crib and changing table are hand-me-down from our first child so we didn't have to spend any money there, and the little white dresser came from my mom.  It was originally intended for something else, but it tucked in that spot just perfectly and gave us some extra storage space for her.

I love the combination of plaid, ticking stripes, and ric-rac trim!  One sheet is plaid, the other is ticking striped.

Now onto some details.  The bedding is Pottery Barn brand, but I certainly didn't pay PB prices for it.  I paid all of $5 for the whole set at a yard sale!  It was practically brand new and came with the bumper pad, bed skirt, and two sheets.  It has such a sweet style to it and of course I love red and white, and the farm theme is so cute.  I bought the set before I was even pregnant, not knowing if we would have a boy or a girl, but figuring it was neutral enough to be fine for either.  

I bought the two bolster pillows much later at a different yard sale for $1 each.  I couldn't really remember exactly what the bedding set looked like, but I knew it had red and white so I got them.  I was so pleased when I finally did get the set out again and realized the bedding also has red ric-rac trim on it like the pillows do!  They could have been sold together originally they look so cute together.
 After I got the bedding put on the bed the area above the crib looked so plain and I really wanted something cute, but also something that didn't cost much of anything.  The first thing I tried was printing out homemade art with the letters of her name and used Washi tape to attach them to the wall and surrounded them with an empty red frame I already had.  And I liked it just fine.  At first.  But then it seemed to need something more.  It seemed awfully lonely up there all by itself.  So then I got the idea of printing off coloring pages and letting each of the kids color a page for her wall.  I spray painted some thrifted frames with red spray paint I had left over from another project and added them to the wall.  But once I had them up there I didn't like the printed letters anymore.  I loved the coloring pages, but the other part just didn't seem to be the right fit anymore.  

I searched Hobby Lobby looking for inspiration, and even went through all of their posters and art work trying to find just the right thing, or at least an idea of something I could make at home.  But I came up with nothing and every day those letters drove me more and more crazy.

And then one Thursday morning I saw an ad for an estate sale that started that morning.  By then I was 41 weeks pregnant, but that didn't stop me.  I bundled up the kids and hustled them into the van and we went to check it out.  The home had a couple of sheds outside that were full of stuff for sale and in a dark dirty corner of one them, behind a box.....I spied it.  

The perfect piece. 


A large cross stitch style, pastoral scene done with yarn.  So sweet, so simplistic, so vintage, and so imperfectly perfect!  I asked the man in charge how much for it and a $2 price tag was just what my wallet ordered. 

 It was a bit dirty and scuffed up so I brought it home and gave the cloth part a light scrubbing with a bit of soap to clean it up and I gave the frame a light coat of fresh white craft paint to brighten it up.


It was the perfect size to fit inside the empty red frame that had already been hanging there so I glued the red frame to the white frame to give it some more impact and make it stand out more so that the white frame wouldn't get lost against the pale wall.

 Ahhhhh....MUCH better!!  Now I LOVE it!

I love the combination of an "art" piece and also having my kiddos artwork up there too.  

                                Colored by the 5 year old.                                                               The 8 year old's work.

 It makes it that much more special, and they're pretty proud to have their work displayed like this.  :)

 I also love how the style of the apple trees on the vintage piece so closely resembles the apple trees on the bedding set.  


 On the other wall is her changing table. 


 I tucked in a little spindle lamp that I've had for years and added a low wattage bulb to use for those middle of the night feedings and diaper changes.  The dresser has little cubbies with baskets that hold diapers and other sorts of baby paraphernalia.  Above the table is a mirror with hooks that I got a yard sale for $1.  It originally had a different style of hook, but 2 of the 3 were broken and I absolutely could not find matching ones anywhere.  So I ended up just getting a completely different style to replace them.  They were 50% off at Hobby Lobby so I think paid about $4 or so for the 3 hooks.

They're pretty handy to hold her quickly growing headband collection, as well as a handy spot to hold the little diaper disposal bags for easy access during changes.

 On top of the little white dresser sits a picture my grandma gave us years ago.  It's one of her favorite scenes and I thought it would be special to include it.


You may have noticed this piece sitting at the end of her crib.  My dad made it for my niece as a dress up center to store her dresses and shoes, but she had outgrown it so it got passed on to us.  It fits just perfectly at the end of her crib and makes a great little "closet" since she doesn't have one of her own.


And that, my friends, concludes our story on how I put together a simple farm themed "nursery" for under $20.  


Monday, January 25, 2016

Baby Girl Has Arrived!

 I am so very happy and excited to announce that our baby girl, Anna Mae, has finally made her arrival!

 She was 2 weeks overdue, but boy when she was ready to come she sure made a grand entrance!  She was born in the backseat of our van 10 minutes from the birth center.  My husband was driving like an Indy car race driver and my mom was there to deliver the baby.  Thankfully, all turned out well and everyone is healthy!

Announcement sign outside the birth center

She weighed 8.5lbs and was 21" long, with strawberry blond hair and what we think are blue eyes, though sometimes they seem to have a hint of green in them like mine.


We recuperated at the birth center for a couple of hours and then made our way back home where we've been enjoying loads of snuggle time and big sister and big brother are just eating her up! 


She is just too sweet for words and we are overjoyed and so very thankful for another beautiful and healthy baby! 

Sunday, January 10, 2016

Upcycled Winter Snow Village

So....what do you get when you combine various and random Christmas village pieces from thrift stores and yard sales, a candle shaped like a tree, a couple of Christmas ornaments, and some leftover light fixtures that have been replaced in your home?


We'll get to that answer in a minute.

First let me just say, now that all of the holidays are over and things have slowed down just a bit (STILL waiting on Baby Girl's arrival...due date was yesterday!) I wanted to pop in and share this project I did back at the beginning of December.  I did it for Christmas, but actually I plan to leave it up through January because it's more "wintery" than it is Christmas so we can enjoy it a bit longer.

I've always loved Christmas villages, but I've never set about collecting one thus far because 1) we haven't had the room to store all the extra boxes it would take, and 2) I've never really had a good spot to set one up.  But this year I decided to do one on a smaller scale and on the cheap.

So how do you turn all those random things I mentioned before into some semblance of a village?


You spray paint everything white, Mod Podge on a little glitter, add some white lights and white sheet and VOILA!  You've got yourself a wintery snow village.


I even spray painted and glittered the candle tree to make it match.  I also added in my yarn "snowballs" that I made a few years ago just to add some extra interest and texture.


The little clear trees were a set of Christmas ornaments that I found at a thrift store that already had silver glitter on them. I love how the clear glitter on the houses resembles sparkly snow.


And the leftover light fixtures?  Well, I used the glass globes from them and stuffed some of the string of lights up inside of them to make them glow.  They look like big balls of sparkling ice to me.  :)  The rest of the string of lights was tucked under a white sheet to make it look like glowing snow.


It's amazing how a little bit of spray paint can bring random things together and make them cohesive.


My total investment in this village was about $6.  I tried to only pick village buildings that were less than expertly painted to begin with, that way I didn't feel so bad covering up someone else's work, lol!


It's glowing and beautiful and we've really enjoyed it and will continue to enjoy it for a couple more weeks.

I'll be sure to keep you posted on Baby Girl's arrival.  Hopefully SOON!  We're all getting very anxious for her to come.  :)

Wednesday, November 25, 2015

Superwoman Over and Out

So.....here's the deal.

As much as I wish I could have shared our fall decor with you all, and as much as I would like to share the Christmas decor with you once I get it up, the reality is....I just can't.  I can't do it all.  I have to face the fact that I am indeed NOT Superwoman.  I only have 6 weeks left until this baby is due and we don't even have a crib or a changing table set up.  Life has been so busy and I feel SO unprepared for this one.  

I also feel like this at this point.

(source)

Our other two kiddos are in soccer this year and they're in different age groups so they haven't different game times or sometimes the same game time on different ends of the park so Hubby and I have to do a halftime switcheroo-swap in order to watch both kids play.  I'm sure it's quite a site to see me speed waddling back and forth!   I've been finishing out my waiting list for the feedsack shower curtains (almost done!) plus packaging up other Etsy sales and getting them shipped out.  Combine all of that with the amount of time I've spent running to the bathroom every time baby moves and I've been one busy lady. Homeschooling has been hit or miss during all of this, and the housework has just gone down the tubes and it makes me crazy.  I don't function well or happily when the house is constantly in a state of needing to be cleaned.

So....all of that being said, I feel like I need to take a break from blogging for awhile and keep my priorities in line.  The Christmas season is almost upon us and I am bound and determined to make it as stress free and fun as possible.  Last year was nutso and I felt like I never got to do anything carefree and fun with my kiddos.  Not this year though.  I've turned down opportunities that would have become obligations, and I'm scaling back on things that just aren't a priority.  And as much as I love you guys, you're not more important than time spent with my family or time spent on my duties at home.  (I'll be closing down my Etsy shop too.)  So I plan to be scarce around these parts for a couple of months.

I might pop in here and there because I do have a couple of projects that if they turn out like I'm hoping I would love to share if I can.  But don't expect any sort of regular posts or even that I'll share my seasonal decor.  I just don't have the time (or the energy at this point...remember the fat gorilla?) to do it all.

If you don't already follow me on the Facebook page, be sure to do that if you can.  It's much quicker and easier to share a cellphone photo and post over there than it is to take a whole series of pictures and then spend the time editing them all, water marking them, and then writing a whole post with it.  If you're not a Facebook follower then you've already missed one of my dreams come true.  Hubby bought me a Hoosier cabinet for my birthday and I am SO excited about it!  I absolutely love it, and it looks amazing in our kitchen.

So anyways, I just wanted to give you a heads up and let you know what's going on and the reason I've been scarce lately and will continue to be scarce in the next couple of months.  Baby #3 is due January 9th and we're all getting very excited for her arrival.  She will be the ultimate project reveal.  :D  

But please be patient with me in the meantime.  
I feel the need to retire my cape for awhile.


Related Posts Plugin for WordPress, Blogger...