Friday, January 30, 2015

Picture Frame Christmas Wreath and More Knock-Off Decor

Hey everyone!  
Today I'm sharing the last bit of Christmas decor from this year.  I did some Pinterest inspired things that I wanted to share with you, as well as share a neat little photography trick that I used.

I had SO very much going on this season that by the time I was finally able to get around to actually decorating I was not feeling very creative or original at all.  I just wanted it up and done.  So I scoured my Christmas board on Pinterest to try and get my creative juices flowing.  I saw a few ideas there that got me moving.


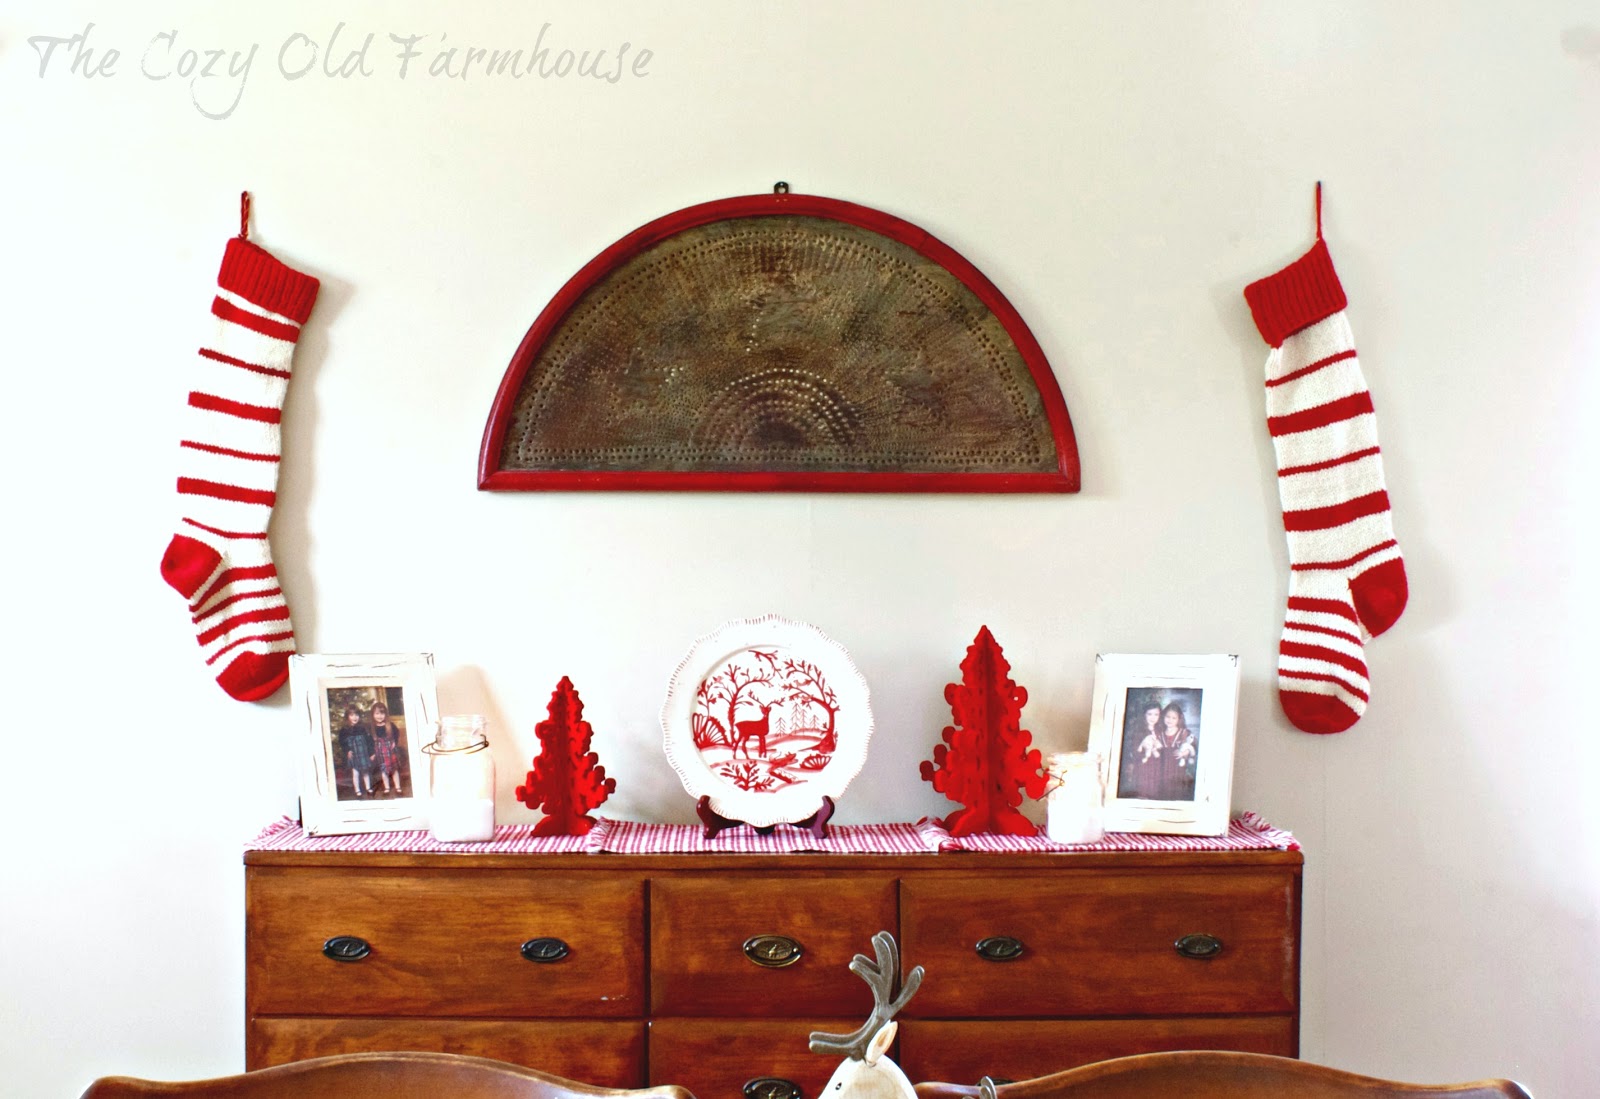
This is the shelf that hangs above the couch in the living room.  I kept it fairly simple this year with a wooden star hanging above, a white ceramic Nativity, candles, antique wooden toys, greenery, and red berries.

The wooden star idea came from my Pinterest board.

(source)
 I already had a similar star that I got at a yard sale a couple of years ago as well as some extra large galvanized jingle bells. 
 (I found the picture on Pinterest, but couldn't find the original source.)


Here's my version.


I love these little wooden animal toys.  My mom bought them at an antique store 30 years ago and I love the touch of simple rustic-ness they bring.

(source)
This candle idea was another one from Pinterest. 
 It caught my eye because I knew I had similar rustic snowflakes.


I used the candles that were on the dining room buffet in the fall, and just turned them around so the key was in the back and hooked the snowflake to the twine that was already on the candle.  I set them both up on pieces of the Christmas tree trunk that Hubs had cut off.


I enjoyed the simple rustic look of it all very much.


The third idea I "knocked off" was this picture frame wreath.  
(Again, I couldn't find the original source.  The blog must not exist anymore.)  


As I was looking over the board I saw this pin and it struck me that, "Hey! I have the perfect frame for this!"  I had just decorated for our church Christmas banquet and had bought and spray painted a frame to use as a photo prop that I knew would be just right for this.  I dug out my box of garland from the shed and came up with my own version.


I added a string of white lights to it that gave off the most beautiful cozy glow above our new piano.  I also tucked in some bunches of faux berries here and there.


 I really loved how it turned out!

 This last picture has nothing to do with decorating, but it is a little DIY frugal photography trick I wanted to share with you.


Can you see the difference in the two pictures above?
The one on the left is darker and has harsh shadowing on the right side of the wreath since the light source was coming from the window on the left.  The picture on the right is brighter and the shadowing is greatly reduced.  Different exposure settings you say?  Nope.  Same exact settings.  Different times of the day?  No, both pictures were taken within 10 seconds of each other.  Fancy umbrella flash on a stand?  No flash was used in either of these pictures.  Good editing skills?  Wrong again.  

The answer is.....poster board.  Yep, just a 33¢ piece of white poster board.  As I was taking the pictures I noticed the harsh shadows being created and I realized I needed to reflect the light coming from the window back onto the wreath.  Sitting nearby was a poster board calendar I made for my kids awhile back so I used the plain back side of it.  Using a tripod I set the camera to the timer mode, pushed the button, then quickly positioned myself just to the right of the wreath holding the poster board so that it caught the incoming light and bounced it back onto the wreath.  Pretty neat trick, huh?  My aspiring photographer brother taught me that trick when we were just kids.

That does it for Christmas decor pictures for this year.  I had more decorated, but just did not feel inspired to take pictures of any more of it.  Hopefully I'll be a better blogger next year.  : )

In other news, all the free products I ordered have been delivered.  Yay!  Now, I have 2 weeks to get them up and blog about them.  Two items are part of current projects that will help finish them off, one item is going to be the starting point of our next room makeover project, and the other two items are much needed replacements but aren't necessarily a big makeover project.

So stay tuned for that post coming up in.....2 weeks!  :D 

Monday, January 19, 2015

Red and White Nordic Christmas Decor

Ok, so Christmas is long past by now...I know I know.  But by way of explanation for my tardiness on sharing my Christmas decor, here-in lies my excuse.  I wanted to focus on my family.  Plain and simple.  I had many responsibilities this year between church, home, and Etsy shop and I didn't want my family to "miss" me because was I too busy blogging in the down moments to actually enjoy the moments with them.  And I did enjoy my time with them, so very much.  I didn't even stop to take one single picture on Christmas day.  Can you believe that?  I just wanted to soak it all in instead of forcing everyone into cheesy smiles and frustration of stopping every 2 minutes to "capture the moment."  And for what?  So that the Facebook world could see how great of a day it was for us?  No thanks.  I just wanted to cherish each moment in my heart and be really present and focused on my favorite people.

So....that is why I never got around to sharing pictures of my decor.  

But now that things have slowly returned to normal around here (in all honesty though, my dining room tree is still up, so not completely normal yet) I have a bit more time to share.  I promised I would, even if it was late, so here goes.  :)

The below picture was a cell phone shot I shared on Facebook of the overall view of the dining room.  If you're just now joining us, we had two full size trees this year!  The family tree in the living room, and then "my" tree in the dining room.  I kept the whole dining room and kitchen a red and white Nordic style theme, and then the living room was a little more traditional with reds and greens.


You can read more about the red and white tree {here}.  

I really enjoyed having a tree in the dining room this year.  Will I do it again next year though?  Most likely not.  Simplicity is my goal for next Christmas.


I found the tablecloth at Home Goods this year and thought it fit in perfectly with a Nordic farmhouse style.


The centerpiece on the table was a cloth napkin layered underneath a vintage wire paper organizer, filled with fresh greenery clippings (though not so fresh anymore by the time I got around to taking pictures of it), and three adorable Nordic style reindeer bought a few years ago from Home Goods.


I found these adorable little snowflake plates at Oriental Trading of all places!  I was ordering some things for the kids' class I teach at church and happened upon these and loved them!  They're ceramic and sturdy and I so enjoyed using them this year.
(The plates can be found {here} if you're interested.)


I've had those knit stockings for years and I still love them just as much as I ever have, probably from Home Goods as well, lol!  The middle punched tin piece was bought at an antique store years ago and I love incorporating it into our Christmas decor each year.


On the top of the buffet I layered 3 place mats that were thrifted, and added in white distressed frames that I've had for years but rarely ever display for some reason.  The picture inside is of my daughter and her BFF cousin a couple of years ago.  It's a little too bright to see them well, but the jars had Espsom salts and a votive candle in them.  


This platter was also bought at Home Goods this year and I love it so much!  It was perfect in this room.  The red felt trees were a thrift store find from a couple of years ago.


And on this end of the buffet was another jar candle and picture frame, with a more grown up picture of the girls from last year.


The curtains that are always in here fit in perfectly, and in each window I placed some favorite things.


The kids helped me spray snowflakes onto the windows and it looked SO festive and cozy!  We used a stencil and a can of fake spray snow.  It was especially fun since we live in Florida and there's no hope of ever seeing real snow.  One window had my favorite carved-looking Father Christmas and the other window held a little ceramic tree lamp that was given to us by my husband's grandmother.  I've always loved it and this year it fit in perfectly with the red and white theme.


Up in the big arched window I replaced the aqua canning jars with my collection of Jim Shore Father Christmases.  I love these guys and their quilted looking garments and how they have the look of being hand carved.  My family has gifted these to me over the years and I love them.  This is the first time in years that I've actually had a place to display them and I was so happy to finally be able to unpack and display them.


(Affiliate Links)


I shared this cell phone picture of the kitchen on the Facebook page.  I think this lighted garland that I put together was my favorite bit of decor besides the trees.  It was beautiful and cozy and had a lot of impact on the room.  

The ribbon that was wrapped around it also had the red and white Nordic theme going on.


Well, that wraps up the decor for the dining room and living room for this year.  In my next post I'll share just a couple of things I did in the living room.  I didn't take pictures of everything, but there were a couple of things I did that I want to share.

Also, stay tuned for some fun upcoming posts!  I'm so excited to be doing my first partnership here on the blog and I had the opportunity to select some products to try from a building website in return for blogging about my experience. Some of the things I ordered should be here soon so I'll be sharing those in the next couple of weeks, 2 other things were backordered so it will be next month before I share those.  But it's a very exciting thing for me and it'll be fun to share!

Oh yeah, one last thing.  Be sure to stop by the Facebook page and check out a sneak peak "Before/After" picture of my current room project.  It's a dramatic difference already and I'm not even done yet!


Related Posts Plugin for WordPress, Blogger...