Friday, March 30, 2012

Eyesore to Eye Candy - A Country Farmhouse Lamp

I posted this picture last summer (or maybe it was Fall based on the blanket that's on the couch) of some thrifty finds I had come across. 


Among them was this lamp from Goodwill for $3.99.  I'm not really sure why it caught my eye, but there was just something about it that appealed to me.  I almost didn't buy it though.  I walked away and kept shopping, but it was just stuck in my brain so I went back for it.  My husband just shook his head at me.  


I didn't really know what I wanted to do with it other than I wanted it to be my style in colors that I love.  I didn't want to copy anyone else, or follow a style that wasn't mine.  So I went to Hobby Lobby and JoAnn's and perused the fabric departments looking for inspiration.

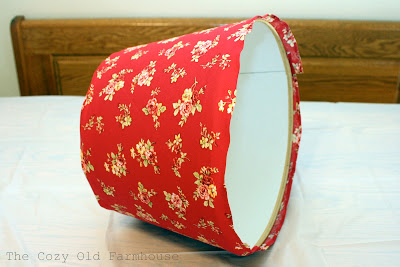
It came when I found this fabric, and I posted this picture as a sneak peak of an upcoming project.


I taped off the electrical parts and spray painted the base of it yellow.  It has taken me so long to finish this project that I don't even remember now what the color was.  I know it was Krylon and it was the paler yellow, not the bright one.


Figuring out how to trace/cut the fabric for the shade was a major pain!  The shade is smaller at the top than at the bottom so just cutting a straight piece of fabric wasn't going to work.  I did a few practice runs with wrapping paper trying to figure out the best technique.  I think I ended up laying the fabric on the floor, anchoring it with tape, and then rolling the shade along it and using a pencil to trace a pattern on the back side of the fabric.  I then double checked it by laying it around the shade and checking my trace marks.  It still didn't work perfectly, but it was close enough to work with.

I then used a spray adhesive to attach it to the shade.  I trimmed the ends, tucked them under and hot glued them in place.


This was my first time of redoing a lamp and the shade didn't turn out perfectly nor does it really look professionally done, but it's good enough to use here in my own home.

I bought red gingham ribbon to use as a trim around the bottom, but after I had it all glued into place I decided it was just too skinny.  It didn't make enough of an impact.  I forgot to take any pictures of it with that trim on it and realized only after I had already pulled it off.  So here I'm holding it in place to attempt to show you.


It stayed like that, with the skinny trim on it, for months.  It was just one of those things that I lost momentum on and it got set aside.  But I decided that I was going to get it done.done.done. this week!  

I bought a wider trim, but.....it wouldn't lay flat due to the slightly sloped angle of the shade.  It looked terrible.


 There was no way I was scrapping this lamp, I had come too far.  And there was no way I was going to try and find a different shade, buy more fabric, and start over.  
So what's a girl to do? 

I then decided instead of trying to fight the wrinkles, why not embrace them?  I began to play around with making a ruffled ribbon of sorts.


It took F.O.R.E.V.E.R.  But an episode of Celebrity Apprentice made the time go by much quicker, and two hours later I had a beautiful ruffled ribbon.


This lamp has a pull chain, but it was kinda plain and boring, plus it was corroded and gross looking.   So, after a suggestion from a friend, I took the chain from our living room ceiling fan to use.   I aged it a bit with some Spanish Copper Rub-n-Buff. 

 Can you see the difference the aging made?  It's subtle, but makes such a difference.


I clipped off the old chain and attached the new one with the little connector piece.

Old, gross, and boring                               Much improved


So, after months of procrastinating, here it is all finished.


Homemade/DIY ruffles.


Side by side, before & after.


Stay tuned to see what I ultimately decided to do with my Country Farmhouse style lamp (and if I ever bought another chain for the living room ceiling fan).    : )


Linking up to:

Monday, March 26, 2012

Springified!

I'm finally back.  We enjoyed several days of bee-u-tiful weather.  The kiddos and I spent a lot of time playing outside and getting some sun.  We made a sort of last minute weekend trip to Missouri to see my husband's grandmother.  It had been about 3 years since our last visit and we're not sure how much longer she'll be around so we wanted to see her again.  It was a LOT of driving in a short period of time, but it was worth it.  We really enjoyed seeing her and the kids did great.  We're so glad we went.

Anyways, I'm on a sort of Spring break this week.  We got a little bit ahead in my daughter's pre-school homeschooling curriculum so we're taking this week off.  I'm pretty sure I'm more excited about it than she is!

A few weeks ago I saw Donna's post about her Spring mantel and I felt inspired to Spring-ify a bit around here, too.


We made a trip to good ol' Hobby Lobby for some greenery and I added some in an old blue canning jar along with some "river" rock to the shelf above the couch.


I put my floral pillow back on the couch, added a pastel colored old feed sack quilt to the loveseat, added more greenery in a jar to the crate/end table by the couch, and changed out the curtains.


I added a bit of greenery back to this crate display.  I had some here before, but then I moved it elsewhere for a photo shoot and it never made it back.  So I bought more so that I could have it both places.


So this is what the crate display looks like for now.  Notice my Edison Lamp is missing a bulb?  My daughter knocked it over and the bulb shattered into a million pieces.  I'm thankful it wasn't the glass cylinder that shattered, but I haven't been able to find another bulb to replace it yet.  Seems that the local stores are already on the "energy saving" bulb band wagon and no longer carry the one I need.


I'm enjoying the lighter feel of the place.


We just had family pictures done, first time in quite awhile, so I'll be changing out the majority of these pictures on our "gallery" wall above the loveseat.


I haven't forgotten that I promised pictures of the kitchen.  I plan to use my "week off" to complete 2 more projects that have been in limbo.  I also hope to add a few more items to my Etsy store.

Thanks for stopping by, I hope you're having a great week!


Linking up to:

Saturday, March 17, 2012

I'm Still Here, I Promise

I know I promised pictures of my kitchen and I'm in the midst of another project as well, but.........the weather has been SO beautiful here in northern Ohio.  Very unusual for this time of year and I haven't been able to bring myself to be stuck inside taking pictures.  I've been spending all my free time enjoying the sunshine with my kiddos.  But I'll be back, just as soon as I get a good dose of Vitamin D.

Thursday, March 8, 2012

A Gloomy Day

I realized today that I have never shared what my whole kitchen looks like.  I've shared a picture or two here and there of small bits of it, but never the whole thing.  As I was getting ready this morning I thought, "I should get the kitchen all cleaned and spit polished and take a few pictures to blog about."  

But.....I was forgetting that this is how it looks outside today.


Not a good day for trying to take indoor pictures.

So, just know that I plan to do that very soon.


Related Posts Plugin for WordPress, Blogger...