Wednesday, September 21, 2011

What A Difference 5 Minutes Makes

So I finally got the Fall decorating complete.  It took me a lot longer this year than it usually does.  Having a curious little explorer crawling around getting into everything makes it a longer process, but a much more interesting one for sure! 

Today I'm sharing a quickie little 5 minute makeover I did.  I found this garish looking candleholder at Goodwill, paid $1.99 I think.  I knew I could tone it down and make it more my style.  When I say garish looking I mean bright, shiny, brassy/coppery gold with weird orange undertones.  Not my style...at all.


I used two different colors of Rub-n-Buff.  I first did a layer of the Silver Leaf, I thought it would add to the overall tarnished look I was going for by having a 3rd color in there.  Then I went over the whole thing with Spanish Copper, and literally 5 minutes later I had the perfectly tarnished look I was going for.


I didn't intend to use it for a candleholder.  I thought maybe I'd use it to add some height to a display by setting a faux pumpkin on it, or even use it as the base of a cake plate or something.  But, gasp!, I actually liked it for it's intended purpose.


I love the simplicity of this display on the coffee table.  And I'm loving how the Fall colors are mixing so well and complementing it's newly madeover look. 
(You can see that re-do {here}).


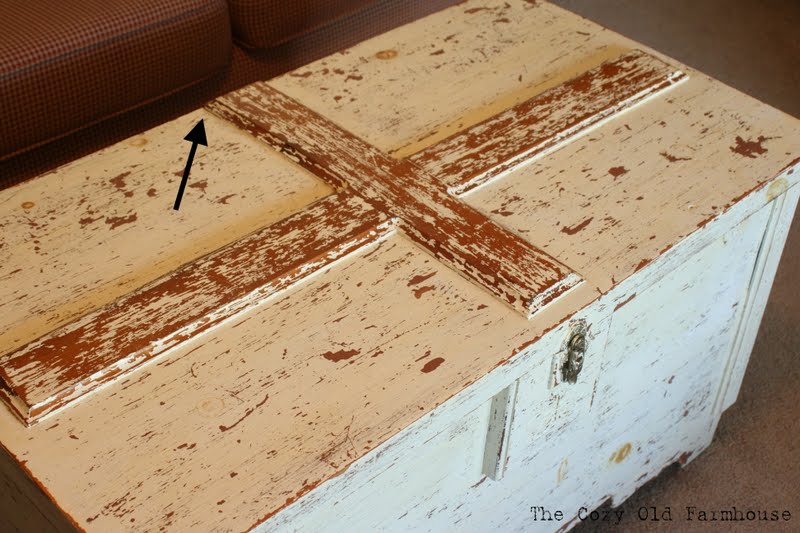
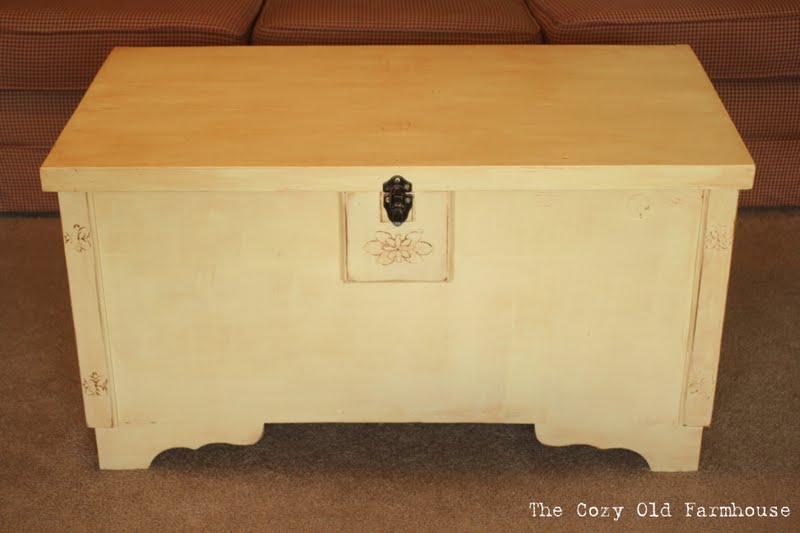
If you haven't tried the Rub-n-Buff yet, go out and get ya some!  I'm not being paid to say this, just want to share the knowledge 'cause it's great stuff.  I've used it on a few different projects (a mailboxa vintage tissue box cover, and the coffee table makeover). and it adds a great effect.  It can be found in crafty type stores in the paint section, and is about 3.99 a tube (even less if you use the 40% off coupons).  The stuff lasts forever because a little goes a long way. 

Anyhoo...hope you're having a fabulous day.  Happy Fall Y'all!


Linking up to:

Saturday, September 17, 2011

Fall Art {Free!}

I've been working on getting all my Fall decor up, not finished yet, but I wanted to share a little project with you. 

This picture was taken 2 years ago at a different house, but these black frames have looked like this for years.  I took those pictures back in 2002 I think and they had been framed like that ever since.  They were ready for an update.


Now they look like this.


These are pages from the October 1st issue of "Woman's Day" magazine.  They really caught my eye, I loved the look of them.  Then I thought of my black frames that needed an update......


I ripped the edges and darkened them with scrapbooking ink, and then added a little strip of colored paper on the edges of each to mat them.


I'm loving the look and the fact that they were free! 

{The large picture in the center has special meaning to me for several reasons.  #1) It belonged to my now deceased grandparents.  #2) The truck has the name of the town they lived in on it, #3) It has pumpkins!!  I put it up every Fall, and #4) I LOVE LOVE LOVE those old style of trucks.  I want one some day!}


Linking up to:

Friday, September 9, 2011

Turnin' Yella Ain't Always a Bad Thing

I bought this wooden trunk at half price for $45 about 9 years ago.  It has served various purposes over the years, but for the last 3 it's been used as our coffee table.  At first glance you might think it doesn't look too bad with the old, white chippy look, which is what orginally drew me to it.

BUT......after many years of staring at it, it's flaws became more glaring and I decided to redo it.

From what I can tell, it was originally wood with a typical finish.  Then someone came along and painted it brown...a terrible shade of brown, without removing the finish first.  So eventually these lovely little knot holes began to eat through the paint all over the trunk.


Then someone else came along and tried to salvage it by white-washing it (without removing the hardware first) and I'm assuming added a coat of poly that eventually turned yellow.


Drippy poly that aged to an awful, bodily function color of yellow.


I also didn't care for the cross pieces on the top.  They add some character and visual interest to it, but I found it really difficult to decorate because it seemed too sectioned off, and nothing could ever sit flat.  Plus, the wood pieces weren't spatially even and that drove me nuts.

See how this is the only side that goes all the way to the edge?  Why?  Again....drove me nuts!


So, my hubster helped me out by removing the cross pieces (they drove him crazy, too, because whenever he put his feet up on it to relax, they were always in the way).


Here it is all stripped down, sanded, and ready for primer.  Removing the extra wood pieces left some pretty deep gouges, a little more "character" than I wanted, so I filled those in with wood putty before I sanded it down.

(The wood looked kind of pretty and we considered not painting it, but in the end I decided it would have needed a lot more sanding/stripping for that and that was more work than I wanted.)


I gave it two coats of Krylon primer to help seal in those knot holes and cover up the bits of remaining paint that wouldn't budge.


I bought a quart of paint at the Restore that I thought was going to be the perfect shade of yellow,  but when I tried it out on a test piece it literally looked pukey.  I didn't feel like spending money on more paint, so I mixed my own and hoped for the best.


I used Krylon Satin White as the base and dumped in a few partial containers of yellow craft paint and a bit of brown to warm it up.


After two coats of yellow I began to glaze it..........and it was a disaster.  Looked awful!  Thankfully I still had enough paint left to give the whole thing another light coat of yellow so I could try again.  Later I figured out my rag to remove the glaze should have been damp...what a difference that made!


I bet you didn't even notice the carved details in the before pictures, did ya?


I love how the antiquing picked up all the imperfections.


I had to buy a new latch, the old one got all bent of shape (literally) during the removal of the top pieces.  It was bright shiny, gold brass.  So I sprayed it, and the hinges, with Oil  Rubbed Bronze and touched up the edges with Rub-n-Buff Spanish Copper to give it a more aged look. 


I think the Rub-n-Buff added just the right touch, I love it!


I've always loved the combination of farmhouse red/sage green/ and butter yellow.  It just appeals to my sense of comfort.  So I am loving the extra touch of color!


So here it is again......


Before 


After


It was a lot more work and time consuming than I had anticipated, but isn't everything in life?  It ain't perfect, but I'm pretty happy with it.


Linking up to:


Tuesday, September 6, 2011

SEW Easy "Grain Sack" Pillow

For a long time now I have been wanting a grain sack type pillow.  I'm sure we've all seen the ones sold at Pottery Barn for $89 dollars each....gorgeous pillows - not a gorgeous price.  During my time in "Blogland" I've come across tutorials for faking grain sacks and I stored the info away for a "someday" project. 

Then a couple of months ago I came across this old laundry bag (I'm assuming it's probably a canvas type material) at my neighbor's yard sale for .50.  I knew it would be the perfect material to do a faux grain sack pillow.  A few days later I found the pillow form at Goodwill for .99. 


BUT....I held off and held off because I was intimidated at the thought of trying to sew the actual cover.  I felt like I didn't have the adequate skills to make it.  With two small children and a dog, I knew I wanted the cover to be removable so it could easily be washed.  But I haven't a clue how to sew a button hole or put in a zipper.  Other than that, I didn't know what to do.

Then one day I was browsing through some links I had saved and came across this one, The Five Minute Cushion.  I did not even remember ever seeing this video clip or saving the link. But there it was, a super easy solution to my pillow problem.

So I got to work cutting up the laundry bag, using painter's tape and craft paint to make my design (I mixed my own color using red, brown, and a bit of black).


 I wanted to personalize it more than what a plain Pottery Barn type pillow would be, and knew I wanted to add numbers to it.  When I told my hubby this (he used to work at a feed mill/distributor) he explained the code system of numbers and letters they used.  So I followed that same code using numbers/letters that are meaningful to me.

I used my scrapbooking stamps and adhered them together so I could get it somewhat straight and lined up.  I wasn't worried about it being absolutely perfect, old grain sacks never are, but I didn't want it completey whopper-jawed either.


I provided the link for the tutorial (trust me, SO easy) so I didn't bother taking pictures of everything, but here it is all sewn up and ready to insert the pillow.


And here is my finished product. 
(After the paint had dried, I put it through a wash/dry cycle to fade the paint even more and give it a nice soft/worn look.)


The washing made some of the numbers and letters indistinguishable, but that's okay, it just adds to the old/worn look.


Doing it this way makes it sort of an envelope for your pillow and gives you a flap on the back for easy removal.


The link describes this as a "Five Minute" project.  It definitely took me a lot longer than that with all the painting/washing/and 2nd guessing myself because of my limited sewing skills.  But, the fact remains that in the end it was quite simple to make and I'll definitely do it again!


The fabric cost me .50 (I still have the other half to use for another pillow, so technically the cost was .25), and the pillow form was .99.  So for $1.25 I have the super cute "grain sack" pillow I've always wanted.


Linking up to:
Related Posts Plugin for WordPress, Blogger...